

안녕하세요. 그린주입니다 ๑'ٮ'๑
경험이 많이 부족하지만 최선을 다해 적어보겠습니다!
개요
이번 글에서는 JAVA & DB를 연동하여 Bizppurio SMS 문자 발송 기능 구현 방법을 공유하고자 합니다.
1편 DB 연동이 되어 있다는 가정하에 시작합니다.
## 1편 DB 연동 바로가기
https://green-joo.tistory.com/3
JAVA DB연동 bizppurio SMS 발송 구현 - 1 ( AWS / RDS / Amazon Linux / MySQL )
안녕하세요. 그린주입니다 ๑'ٮ'๑ 경험이 많이 부족하지만 최선을 다해 적어보겠습니다! 개요 이번 글에서는 DB를 연동하여 Bizppurio SMS 문자 발송 방법을 공유하고자 합니다. bizppurio 계정이
green-joo.tistory.com
목차
BizMsg.java
BizMsgRepository.java
BizMsgRequestDto.java
SmsFormComponent.java
BizMsagController.java
BizMsgService.java
Api Test
BizMsg.java
BIZ_MSG 테이블은 아래와 같습니다.
@Getter
@NoArgsConstructor
@AllArgsConstructor
@Table(name = "BIZ_MSG")
@Entity
@Builder
public class BizMsg { // 비즈뿌리오
    @Id
    private String cmid; // 데이터 ID, 고유한 값
    private Integer msgType; // 데이터 타입 (SMS 0/MMS 5)
    @CreatedDate
    private LocalDateTime requestTime;
    @CreatedDate
    private LocalDateTime sendTime;
    private String destPhone; // 수신자번호
    private String destName; // 수신자명
    private String sendPhone; // 발신자번호
    private String sendName; // 발신자명
    private String subject; // 제목
    private String msgBody; // 메세지 내용
}
BizMsgRepository.java
Jpa를 하기 위해 Repository.java파일을 생성합니다.
public interface BizMsgRepository extends JpaRepository<BizMsg, Long> {

}
BizMsgRequestDto.java
발신자, 수신자 정보를 받을 수 있는 Dto를 생성합니다.
@Getter
@NoArgsConstructor
@AllArgsConstructor
@Builder
public class BizMsgRequestDto {

    private String destName; // 수신자명
    private String destPhone; // 수신자연락처
    private String sendName; // 발신자명

    public BizMsg toEntity(String msgBody) {
        return BizMsg.builder()
                .msgType(5) // LMS발송 고정
                .cmid(LocalDateTime.now().format(DateTimeFormatter.ofPattern("yyyMMddHHmmss")) + "TEST")
                .requestTime(LocalDateTime.now())
                .sendTime(LocalDateTime.now())
                .destName(this.destName)
                .destPhone(this.destPhone)
                .sendName(this.sendName)
                .sendPhone("0212341234") // 비즈뿌리오에 등록된 발신번호
                .subject("제목")
                .msgBody(msgBody)
                .build();
    }
}
SmsFormComponent.java
문자 양식만 따로 구분할 수 있는 SmsComponent.java을 생성했습니다.
@Slf4j
@Component
public class SmsFormComponent { // 문자 양식

    public String smsComponent(BizMsgRequestDto bizMsgRequestDto) { // SMS 테스트
        String msgBody =
                "[SMS 테스트 양식]\n" +
                        "\n" +
                        "안녕하세요. " + bizMsgRequestDto.getDestName() + "님\n" +
                        "본 메시지는 MMS 테스트 메시지 입니다.\n" +
                        "발신자 : "+bizMsgRequestDto.getSendName();
        return msgBody;
    }

}
smsComponent 메서드
문자 양식에 필요한 데이터는 파라미터에서 get으로 가지고 옵니다.
BizMsagController.java
Controller의 코드는 아래와 같습니다.
@Slf4j
@RestController
@RequestMapping("/sms")
@RequiredArgsConstructor
public class BizMsgController {

    private final BizMsgService bizMsgService;

    @PostMapping("/test")
    public ResponseEntity<?> smsController(@RequestBody BizMsgRequestDto bizMsgRequestDto) {
        return bizMsgService.smsService(bizMsgRequestDto);
    }

}
smsController 메서드
BizMsgRequestDto를 받아 BizMsgService의 smsTest 메서드로 보내줍니다.
BizMsgService.java
Service의 코드는 아래와 같습니다.
@Slf4j
@Service
@RequiredArgsConstructor
public class BizMsgService {

    private final BizMsgRepository bizMsgRepository;
    private final SmsFormComponent smsFormComponent;

    @Transactional
    public ResponseEntity<?> smsService(BizMsgRequestDto bizMsgRequestDto) { // SMS 테스트

        String msgBody = smsFormComponent.smsComponent(bizMsgRequestDto);
        bizMsgRepository.save(bizMsgRequestDto.toEntity(msgBody));

        return CommonResponse.toResponseEntity(ResultCode.CREATE_SUCCESS);
    }

}
smsService 메서드
BizMsgRequestDto에서 필요한 정보들을 문자 내용에 넣을 수 있도록 SmsFormComponent의 smsTest
파라미터 parentId와 parentCode는 지정된 buket에 /parentCode/parentId라는 디렉터리로 files를 업로드합니다.
이렇게 Entity, Repository, Component, Controller, Service를 모두 생성했습니다.
이제 문자 발송 순서 안내와 Test를 진행해보도록 하겠습니다.
문자 발송 순서
- smsFormComponent.smsComponent(bizMsgRequestDto)
ˇ 전달받은 BizMsgRequestDto를 smsFormComponent에 보내 문자 양식을 생성합니다. - bizMsgRequestDto.toEntity(msgBody)
ˇ 생성된 문자 폼과 함께 build 해줍니다. - bizMsgRepository.save() DB로 insert 해줍니다.
- 완료가 되면 "create_success 등록 성공"을 response 합니다.
Api Test
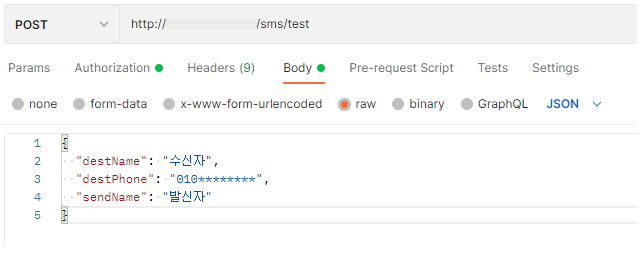
test 실행
{
    "timestamp": "2021-10-25T16:13:49.0386504",
    "status": 201,
    "code": "CREATE_SUCCESS",
    "message": "등록성공"
}
응답 성공!!

BIZ_MSG 데이터 등록 완료!!

문자 발송 성공!!
마무리
이렇게 Spring Boot & Java를 활용한 SMS 문자 발송 기능까지 구현해보았습니다.
다들 성공하셨을까요?? 끝까지 파이팅입니다!
긴 글 봐주셔서 감사합니다!
오늘도 행복한 하루 보내세요 ✿'◡'✿